

How To Create A Video On Wevideo
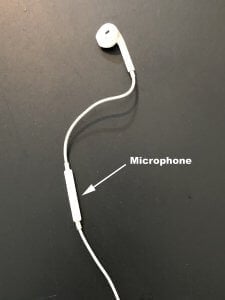
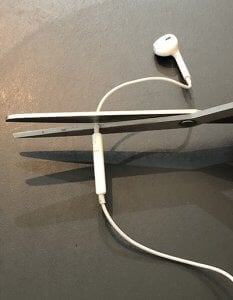
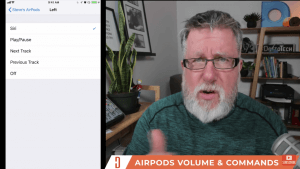
We've all seen our fair share of tutorial videos on YouTube and have inadvertently come to recognize the great ones from the mediocre ones. A great tutorial video answers the "how-to" question as quickly as possible while also being thorough and providing direction to the viewer of what they should watch next if they want more information. The method of creating a tutorial video will differ depending on the topic you're addressing. While we're hesitant to say that there is an absolutely right way to go about making an instructional video, there certainly are methods that are better than others. For example, if you're creating a video on how to change the oil of a car, using your computer's webcam might not be the best choice. Conversely, if you're explaining how to change your email signature in Gmail then a webcam and screen recording are a great fit. This guide on creating tutorial videos will help you get from start to finish by addressing everything from best practices to intricate editing tips that will take your videos from good to great. Let's get started! Before you hit record, start with a plan. Don't expect to have everything come to you as you start presenting. To create an effective storyboard, begin by identifying the topic you're going to address, such as a frequently asked question by your customers or an onboarding experience. At the beginning of the video, you'll want to quickly address what the video will teach the viewer, the tools or items you'll be using and then list the timeline of the steps needed to achieve the objective. This video on how to change your tire does a great job of explaining what the video will teach you, the tools needed and the steps to follow. The purpose of the tutorial video is to explain something in a clear and concise manner so your viewer can understand and repeat what they've learned. So if you're fumbling with words or not presenting your tutorial in logical steps, then your video won't be very effective. Once you have the first draft of your script, practice reading it out loud. You'll often find that the way you write sounds very different from how you normally speak. You'll want to tweak your script to be clear and concise without coming off as robotic. Have a structured beginning, middle and end. You can avoid adding extra work for yourself by identifying when in your tutorial video you'll be speaking to the camera as the subject and when you'll be "hidden" behind other footage such as B-roll or your screen sharing. For example, in our Tuesday Tips & Tricks videos, I'm only in front of the camera for the beginning and end of the video. So during the entire middle section when I'm sharing my screen, I simply read the script out loud for a voiceover as opposed to memorizing the whole script. Sound is a crucial component of any video and there's no exception for tutorial videos. Try to film in a quiet area where you can limit the amount of external noise as much as possible. We also recommend using an external microphone rather than the internal microphone in your computer or camera. A simple lavalier microphone that attaches via your standard 3.5mm headphone jack can cost as little as $10 . Another option is to use any headphones that have a mic attached to them such as the Apple AirPods or any Bluetooth variation. If you've got some old Apple headphones laying around you can actually cut off the end of the headphone and tape the microphone portion to the inside of your shirt for a makeshift lav mic. You don't need to invest in a set of expensive camera lights right off the bat, but before you start filming make sure you're positioned so that the lights are coming at you rather than from behind you. For instance, if you're filming in front of a window it might be better to close the curtains behind you slightly to prevent you from being in the shadows. Conversely, if you're facing a window, consider hanging a white sheet or some light-colored curtains to provide some diffused natural light. If you are considering investing in some camera lights, here are some options in our Getting started with video checklist. Position your webcam so that you're looking slightly up at it rather than down. This will prevent you from appearing as if you have multiple chins. If you're using a laptop, consider placing the laptop on a stack of books so the webcam is at eye level. Secondly, do your best to light your face as much as possible by directing the lights toward you and/or facing a window. With WeVideo you can record an audio voiceover , record your screen , record through your webcam , or do all three at the same time . Depending on what your tutorial is about, some methods will make more sense than others. Here's a tutorial video made with WeVideo on how to use the different types of recording tools. In this video, the user starts by filming himself in front of a green screen for his intro. He then transitions to sharing his screen entirely while he does a voiceover. This is a common and effective structure for tutorial videos that focus on software. Picture-in-picture tutorials are when you have two videos being shared at the same time on the same screen. They're often used in instructional videos where the demonstrator wants to show themselves speaking while also showing what they're doing. Check out the examples below. To do this in WeVideo, simply take the video that you want to be smaller, and place that on the track above the other video. In this case, above the screen sharing video. Next, simply decrease the scale of the top track and you're all set. If you'll be sharing your screen in your tutorial video but are unsure of whether you'll be including a picture-in-picture video of you in the corner, a good hack is to use the screen record and webcam recording feature in WeVideo. This way you have the video of you narrating as you go along explaining what you're doing on the screen if you choose to include it. If not, you can simply lay the video of your screen on the track above the video of your webcam and you'll have your voiceover done for you. There are hundreds of options and techniques for emphasizing things within your video. As you start to create more instructional content this might be something you consider investing more time in. For now, here are a few easy-to-implement tricks to help draw your viewers' attention to the focus point. Another thing to consider especially for longer tutorial videos is to add a table of contents at the beginning. If you're addressing multiple questions in one video you can look at the timestamp of where you're addressing each question and list that at the beginning of the video making it easier for viewers. Once you have the timestamp of each section, list it off using a static text clip and a solid background. Make sure you give your viewers a few seconds to read it. Check out the example of a tutorial video table of contents below. Adding background music can be nice to fill in the lulls of silence, but it can be distracting when it's competing with the voice of someone speaking. 5-Minute Crafts does a good job using music in the tutorial hacks video below. This is also a great example of showing, not telling. When you've finished editing your video and it's time to publish, there are a number of options to consider. Each of these platforms have their advantages and disadvantages and it can often be beneficial to post your content on more than one. Here's a breakdown of the pros and cons of your different options. YouTube is the largest video-sharing website and second largest website in the world making it a great option for getting your tutorial video out to a wide audience to increase awareness and exposure. It's also completely free with the possibility of even earning you money through your own channel. Lastly, you can host a video on YouTube and embed that video somewhere on your website. The downside to YouTube is that since it is so popular, it's easy for a video to get lost in the noise if not optimized for search . Furthermore, given the topic of your tutorial video, it's quite likely that your video will be listed right next to your competitor's. This isn't necessarily a bad thing, but something to consider nonetheless. It's often best practice to post on different social channels and direct web traffic back to your website or YouTube channel. This expands your reach and helps generate awareness. Each channel has different time restrictions for how long your video can be and optimal lengths. For instance, Twitter's video max time limit is 2 minutes and 20 seconds, but videos that are between 30 and 45 seconds tend to perform best. For a more detailed analysis of the optimal video length, hashtags, and time to post for each social channel, check out our free guide on how to create videos that convert . Another thing to consider when promoting your video on social media is whether to paste a link to your video or upload the video's .mp4 file natively. The advantage of uploading your video rather than providing a link is that the video will autoplay on sites like Facebook or LinkedIn. A recent study found that videos that autoplay on Facebook had a 477% higher share rate than those that did not. The counterargument to this, of course, is that if your main goal is to grow your YouTube channel, then you'll want to direct all of your viewers there rather than splitting them between Facebook and YouTube. With so many free options available for video hosting you may be wondering why even consider a paid option. Paid video hosting sites (like Brightcove , Wistia , Vimeo or Vidyard ) often offer better analytic options, more responsive embedding options, faster load times and A/B testing capabilities. If you're embedding the video on your website, you might consider one of these hosting options because uploading a video directly through your website like WordPress will dramatically decrease your load time. This is just something to consider as your tutorial videos gain traction. Each of these options have limited free plans available but charge for their more advanced features. For more marketing ideas check our guide to video marketing. 
How to make a tutorial video?
Planning your tutorial
Start with a storyboard
Script out your content
Plan when you'll be shown on camera
Setting up your equipment
Microphone
Lighting
Webcam positioning
Recording your content
How to use WeVideo screen record
Editing your tutorial video
Using picture-in-picture
Highlighting/emphasizing important aspects of tutorial
Table of contents
Tutorial background music
Publishing your video
YouTube
Social media
Paid video hosting
And that's a wrap! Following all these best practices will have you making quality instructional videos in no time. Share your videos with us in the comments section below for a chance to be featured on our WeVideo social channels. Ready to film your own tutorial video?
Download our "Getting started with video checklist"
How To Create A Video On Wevideo
Source: https://www.wevideo.com/blog/for-work/how-to-make-a-tutorial-video
Posted by: caballeroarriess.blogspot.com
0 Response to "How To Create A Video On Wevideo"
Post a Comment