

How To Draw A Realistic Train Step By Step
How to draw a train: step by step from simple shapes
Learn how to draw a train - steam locomotive with tender coal car and a passenger wagon. Follow the step by step tutorial starting from simple shapes all the way to an awesome train with many details.

Drawing an entire train is a three-in-one drawing tutorial – one for the locomotive, one for the tender coal car and one for the passenger wagon. As usual, the base sketches are simple circles and rectangles. The trick to draw a train that looks really awesome is in adding the many small details. In the following steps, we are drawing each part of the train separately, wagon by wagon, to make the pictures fit nicely onto the webpage. For you to draw the entire train, you want a paper laid down in landscape orientation. Draw a long flat line near the bottom – that will be the rail line, on which all the wagons and engine will sit. Then you might want to mark a simple rectangle for each of the engine and wagons, to have guidelines to draw into. But enough talk, let's have some fun drawing an old-timey steam train!
pencil
,
eraser
,
colour pencils
drawing paper
or
sketch book
Love drawing? Never miss a tutorial!
How to draw a train: Steam Locomotive

How to draw a train steam locomotive: sketch steps
Step 1 : Sketch the base locomotive body

The base sketch of our steam locomotive is made of two simple shapes – a larger square for the cabin, and a smaller rectangle for the boiler – the engine body.
Step 2 : Add the wheels

Next, we sketch the locomotive wheels. Draw the large rear driving wheel first. It is a simple circle, just touching the bottom of the cabin. Now draw a straight line marking the railway – this will give us a base onto which we draw the two smaller front truck wheels. The front wheels are circles about half of the size of the large rear wheel. The front one roughly lines up with the front of the locomotive.
Step 3 : Sketch the cowcatcher and piston
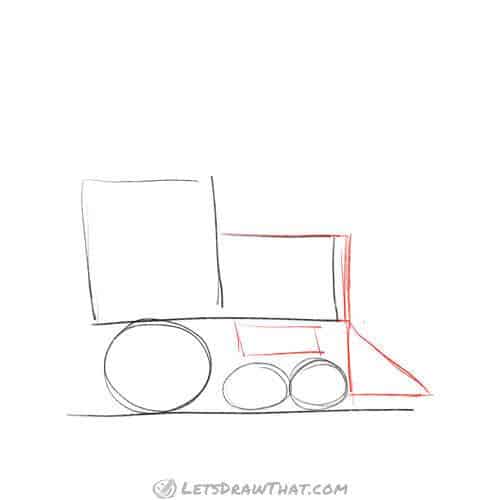
Next, we add the cow-catcher – that is the triangle in front. This was the protective railing on the locomotive to chase cows off the railway line. As you see in the picture, it is time to adjust the size of our boiler rectangle a bit, so the cow-catcher is actually attached to the engine body. Do not worry about erasing the wrong line, if you have done the same – we can use it later, once we start decorating our train. The final addition in this step is a simple rectangle above the front wheels. This is the steam cylinder – the part that drives the rear wheel of our steam engine.
Step 4 : Sketch the smoke-box and cabin details

Let's add a window to the cabin! Draw another rectangle in the upper half of our cabin. Draw a double line at the top for the upper rim, and split the window down the middle with another line. Now add a rectangle with rounded corners under the window – that is the sign for the name or number of our locomotive. Finally, we are getting to the smoke-box, the chimney. It is again built from basic shapes. Start with a narrow rectangle for the bottom. Add two widening lines or a sort of triangle on top of that. Finish the smoke-box with a nice wide rim – just another vertical rectangle.
Step 5 : Add small details
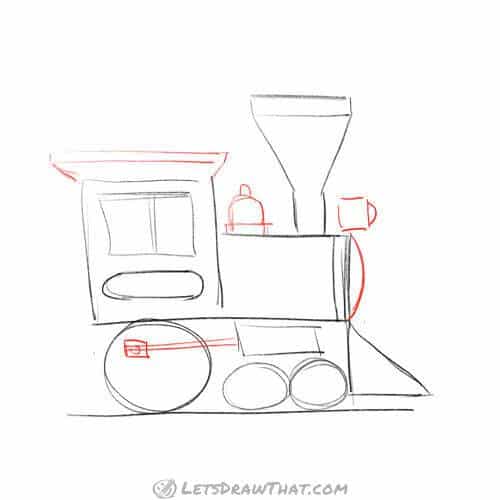
Our steam engine is almost complete – let's just add some details so it looks really good. Let's start with the cabin roof – widen out the top of the cabin and add another rim at the top. Next, draw the steam safety valve – that is the bell-like shape between the cabin and the chimney. While we are dressing up our engine, draw the headlamp – a simple box sitting at the top very front of the boiler. Add a curve to the front for the lamp lens. And as we're drawing curves, add another one to round off the front of our boiler. Our final detail for this step is the driving rod from the steam cylinder to the rear wheel – that is the important part that turns the wheel. We suggest the rod is attached to the wheel with a simple square and a circle in the middle.
Step 6 : Sketch the wheel spokes
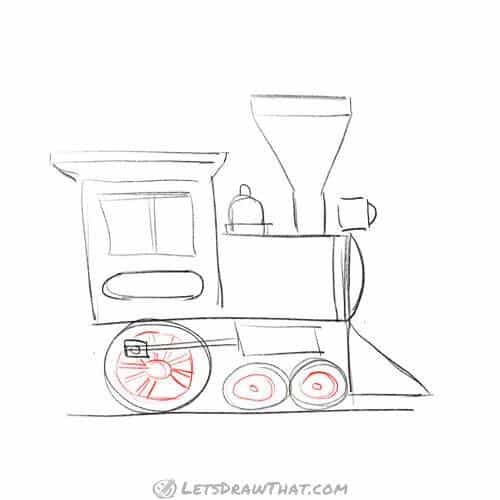
The last details to add are the wheel spokes on the rear wheel. Draw a small circle for the centre of the wheel and draw the spokes out of it. Notice that I have left a gap opposite where the driving rod is attached. If you check the photo, that is the solid counterbalance on the wheel. Finally, we just add simple circles to complete the small front wheels.
How to draw a train steam locomotive: outline steps
Step 1: Draw the wheels and drive train

Time to start outlining our train drawing. Start with the two front wheels. Then outline the steam cylinder, the driving rod, and the rod attachment point. Since these cover the rear large wheel, we need to draw them first.
Step 2: Draw the bottom of the locomotive

With the overlapping rod drawn, we can finish off and outline the rear wheel. Next, draw out the cow-catcher. Outline each side of the front triangle with a double line. Then add two more rods in between to complete the cow-catcher. Finally, let's improve the look of our engine and add the bottom platform that holds the whole locomotive together. A simple rectangle in our drawing is all it takes.
Step 3: Draw the body of the locomotive

In this step, we outline the cabin, cabin roof and the boiler of the locomotive.
Step 4: Draw smoke box, safety valve and the headlamp
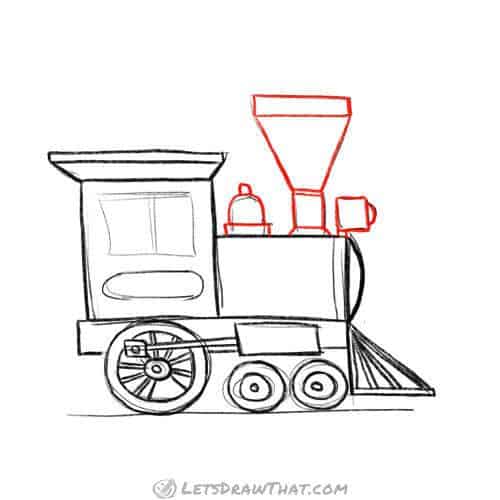
Now let's complete and outline all the parts sitting on the top of the boiler. Start with the bell-shaped steam safety valve. Next, draw the smoke-box, or chimney. Notice we are improving a bit on our sketch – adding a nice angled base, and a fancy two-line stripe where the smoke-box changes shape and goes wide. Finally, we outline the headlamp. The only addition there is the small leg that attaches the headlamp to the locomotive body.
Step 5: Draw the window and signboard
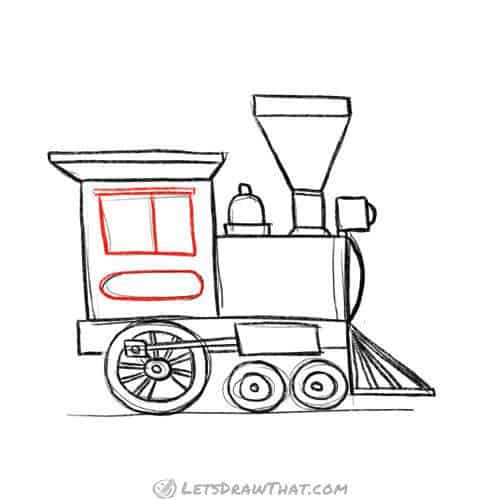
The only two details left to outline are the cabin window and the signboard. Well, we have outlined everything from the sketch in this step, but the drawing still looks a bit bare. Let's see if we can improve it by adding a few extra details.
Step 6: Dress up the locomotive with some final details

Let's start by adding some extra bulk to the bottom of the engine, which will suggest there are parts of the locomotive onto which the wheels can be mounted. Next, we use that extra line from the very start to draw a stripe for the front of the boiler. And while we are at it, let's add another stripe – two vertical lines – to the middle of the boiler. Next, we split the area between the stripes into half, and add a few dots along the inner lines. These suggest the rivets which hold the boiler together. Last but not least, some heavy smoke from the chimney – this is a steam train after all.
How to draw a train steam locomotive: finished drawing
How to draw a train steam locomotive: finished outline drawing

Our usual final step is to clean up the sketch lines by running the eraser lightly over our train drawing, Here is the completed steam locomotive black pencil drawing.
How to draw a train steam locomotive: finished drawing coloured-in

We really like the colour scheme on the Leviathan locomotive photo, so here are the same colours for our train:
Like this tutorial? Share it with others:
How to draw a train: tender coal car

Now that we have drawn a nice steam locomotive, let's add the next wagon to the train. The second wagon we draw is the one that every steam locomotive needs to have – the tender, or coal car.
How to draw a train coal car: sketch step by step
Step 1 : Sketch the simple coal car base
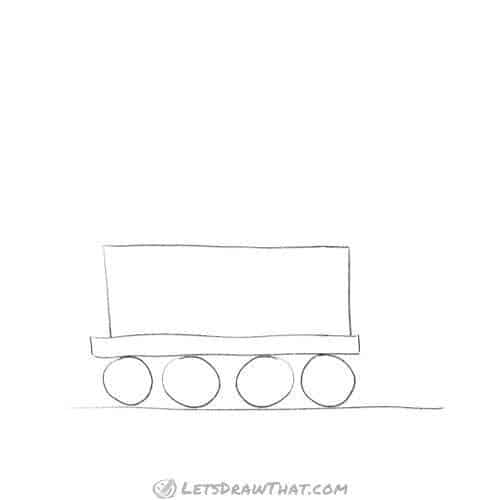
The base sketch of our steam locomotive is as usual fairly simple. Start with the flat line for the ground. Then add the base rectangle for the coal car. Those two lines will help us draw the four tender wheels all same size – so add four circles in. Finally, one more large rectangle for the coal car body.
Step 2 : Improve the tender sketch
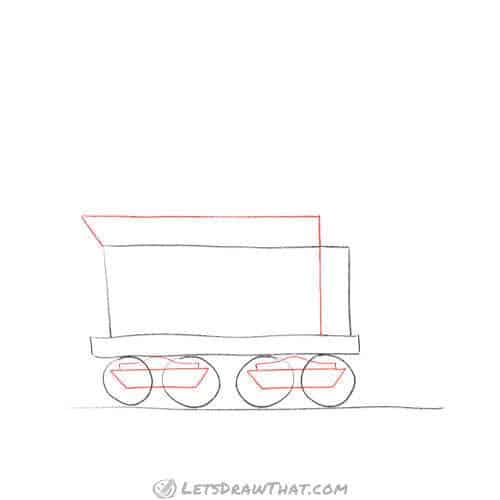
Let's add a few more lines to our tender: First add the top flap, which holds the coal in place. Draw the flap a bit shorter than the body of the tender, and extend it all the way down to the base of the car. That will separate the front, which is actually a door through which the coal from the tender can be shovelled into the steam engine fireplace. Then sketch the springs and truck side frames – those are the parts holding the wheels attached to the wagon. Different types of trains will have different types of trucks, so feel free to simplify the drawing even further if needed.
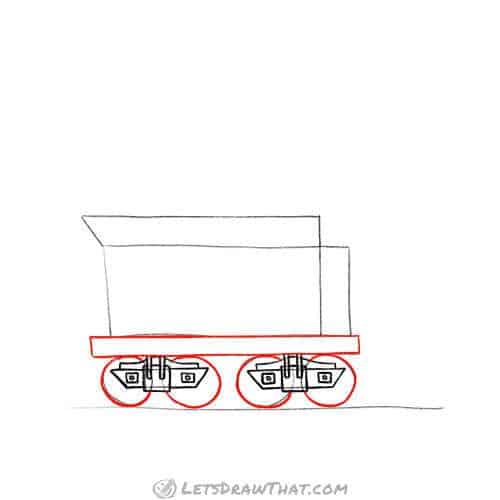
Step 3 : Add the truck frame details

Here we are adding more details to our wheel truck frames – two brackets and a central square that hold the truck in place, and small dot and square bracket for centre wheel axles. Again, this is a very simplified version of the real mechanism which we have half made up. Also, once we colour in the trucks in black, depending on the size of your drawing, there might not be much detail left. So feel free to simplify, or leave some parts out.
How to draw a train coal car: outline step by step
Step 1: Outline the truck frames

With our coal car sketch done, it is time to outline the tender. We start with the wheel trucks because those will partially hide the wheels.
Step 2: Outline the wheels and base of the tender
Keep outlining the sketch – draw the wheels, where they do not hide behind the trucks and the rectangle for the tender base.
Step 3: Draw the body of the coal car

Now outline all the lines making out the body of the coal car. Here we also start dressing up our tender drawing with details – the first one being the railway company sign. That is the long rounded rectangle in the middle, which was not on the sketch.
Step 4: Add extra details
Well, if you like the tender from the previous step, you can stop there. But we felt our tender drawing is still a bit bare, so here are few more details to add. Start at the bottom, with the inner outlines for the wheels. Next, add the lines defining the individual spring leaves on our wheel trucks. Moving up to the tender body, we add a stripe with dots at the top and bottom – these suggest the rivets that hold the tender body together. Finally a bit of decorative outline on the tender front doors.
How to draw a train coal car: finished drawing
How to draw a train coal car: finished outline drawing

Our usual step to lightly clean up the sketch lines with an eraser. And here is the completed drawing of the tender coal car.
How to draw a train coal car: finished drawing coloured-in

We have taken the colour scheme from the photo of the Leviathan's tender: Red wheels and most of the body, with golden bronze or dark yellow for the details – the two stripes, sign, and the door decoration. Black for the base and wheel trucks. Oh, and do not forget to load some coal! (And that is black again.)
Like this tutorial? Share it with others:
How to draw a train: passenger wagon

To make our drawing into a train, rather than just a steam locomotive and tender, let's add a passenger wagon. Again, although the result looks complex, the base drawing is really simple. It is then up to you how many details you want to draw on your train.
How to draw a train passenger wagon: sketch steps
Step 1 : Sketch the base wagon shape

Let's start with the base shape sketch. Draw the baseline, the top of the rails. Then add the four wheel circles. They are the same size as the tender wheels above, but spaced out two and two, with a large gap between the pairs. Time to add a large rectangle on top of the wheels – that is the outline of our passenger car. Make the rectangle wider than the wheels and about as tall as the top of the roof of the locomotive. We will be adding a wagon roof on top of that rectangle later, which will make it a tad taller than the locomotive, which is about the right size. Finally, add two more vertical lines inside the wagon body – these mark out the inside and outside parts of the wagon.
Step 2 : Sketch in the wagon windows

Now it is time to add windows to our passenger wagon. Start with the two horizontal lines at the bottom. They are about one third up from the bottom and mark out the top two thirds for our windows. Now that we know the size of the windows portion of our wagon, draw a rectangle inside the top part of the wagon with the same gap from the wagon body on all sides. Next, draw the vertical (top-down) lines to split your window rectangle into same size windows. On our drawing, we ended up with five windows. But you can have more or fewer windows on your drawing, depending on how long of a wagon and how wide windows you have drawn.
Step 3 : Add the wagon roof

In this step, we are drawing a nice roof for our passenger wagon. First, draw an extra narrow rectangle on the top of the wagon – this is just another fancy detail for the riveted stripe, that will make the drawing nicer. Then we add the actual roof – another rectangle on top, slightly wider, to create an overhang on each side, with rounded top corners. If you want a really easy and simple wagon, you can stop here and just outline and colour in the drawing.
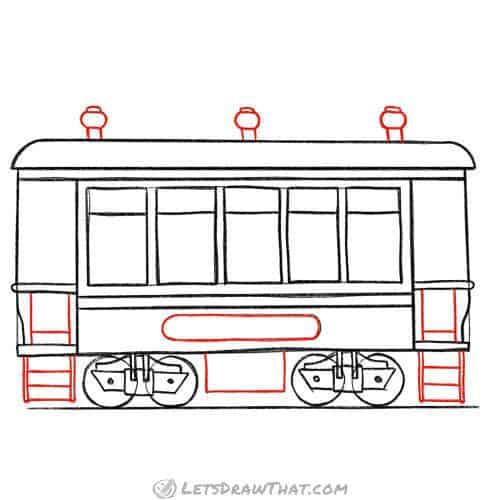
Step 4 : Draw the side steps, doors, and rails

But it is all the little details that will make our drawing look really good. Let's add them in, starting with the step ladders. The two sides we have carved out earlier are the outside platforms, where our passengers get into the car. We need to add a step ladder, one on each side, so people can climb up. Simple rectangles, with double sides. Then add a few steps – we have three. Next, we draw the short doors, so people do not fall off the train. Start with the rail at the top – two vertical lines joined by a small arc. Add an extra line for the floor, to make it a bit thicker. Then two vertical lines to draw the actual doors. And we have gone fancy, and made the outer sides curved in – we like the rounded shapes – but feel free to leave the sides straight.
Step 5 : Draw the wheel trucks
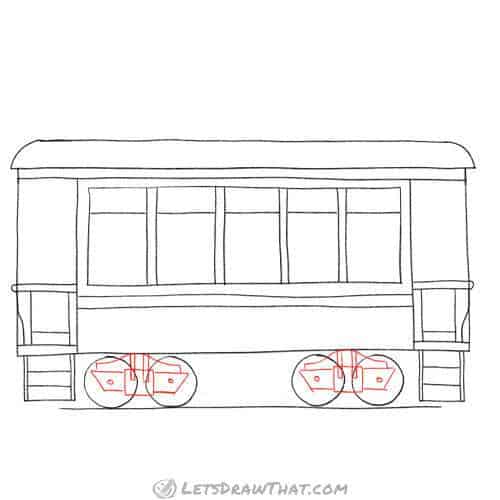
Here we are adding the wheel trucks to our wagon – the bits that hold the wheels attached to the wagon. If these look the same as our tender wheel trucks, it is because they are the same. Check out the steps to draw the tender above, if you need detailed instructions again.
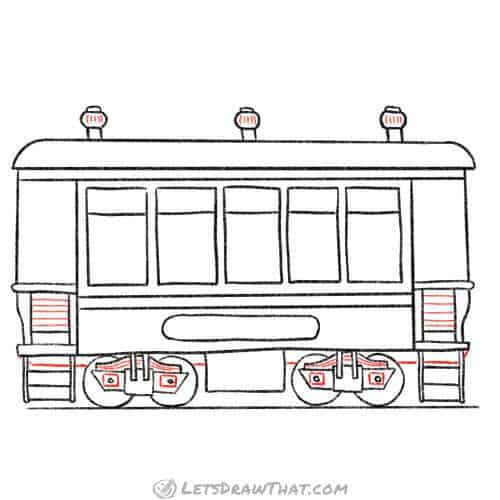
Step 6 : Add the details
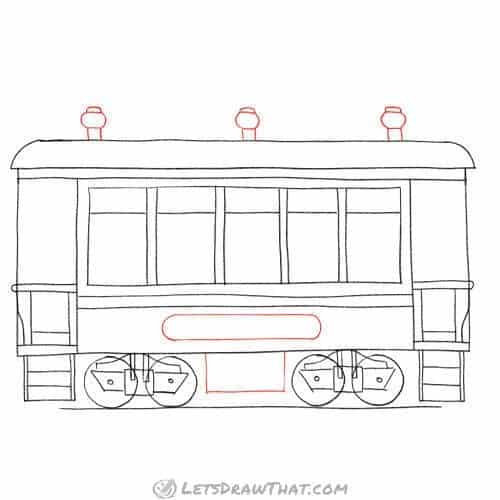
Let's add a few more details before we start outlining the wagon. A simple box at the bottom, between the wheels. Another wide rectangle with rounded corners in the bottom third of the wagon – this will be the sign. And three vents on the roof – they look a bit like mushrooms.
How to draw a train passenger wagon: outline step by step
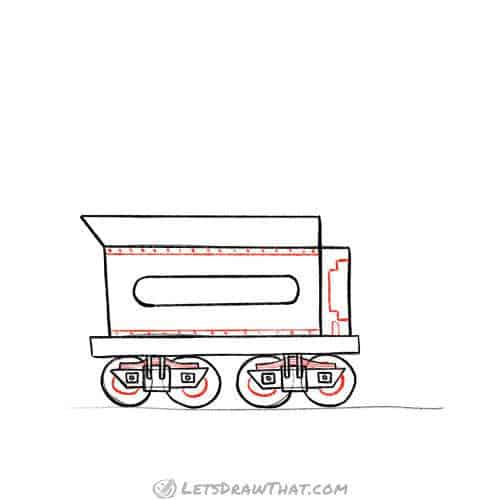
Step 1: Outline the wheel trucks
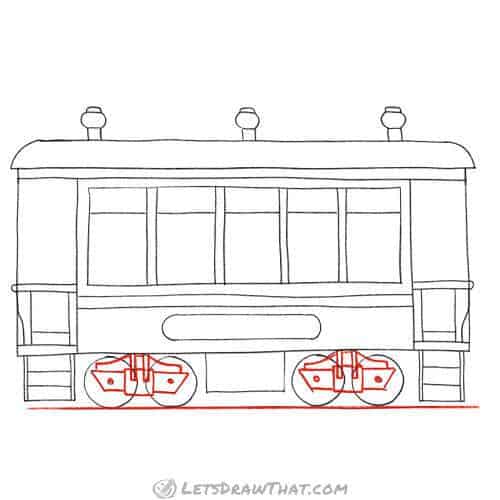
That is enough sketching and adding little bits. It is time to outline our wagon drawing. We start with the wheel trucks since these will be on top and hiding the wheels partially.
Step 2: Outline the wheels and bottom of the wagon

Next, draw out the parts of wheels that are not hidden behind the trucks. Then start outlining the bottom of the wagon and the floor and sides of the outside platforms.
Step 3: Outline the roof and wagon body

Keep drawing out the outlines of the roof and wagon body. This is simple, after drawing all the small fiddly bits!
Step 4: Draw the train windows

Let's outline the wagon windows. Notice that we have drawn them separate, but if you like the upper and bottom lines joining all the windows, that is fine too! Do not forget to outline the decorative stripe in the middle of the wagon.
Step 5: Draw all the details
We are almost there, just outline all the remaining details: the three vents on the roof and the doors and step ladders on each side. What is left? The storage box and the car sign – and we are done.
Step 6: Erase the sketch lines

This is the time to clean up our drawing and use your eraser to lightly remove all the sketch lines. Here is our fancy passenger wagon.
Step 7: Add the details
Oh, bother! I know I said we are done – but now that we have a clean outline, it just begs to add a few thinner lines to make the drawing even better… Let's do it: Stripes over the doors – now it is obvious these are wooden timber doors. Mark out the individual leaf springs on the wheel trucks. And add vanes on the vents. Finally, draw a second floor line behind the step ladders and wheels, to thicken out the wagon floor. We do not want our passengers to fall through the floor onto the rails, do we?
Step 8: … And some more details

Our wagon looks pretty awesome now – so let's finish it off with a few final details. Draw the inner discs on the wheels. Add an "x" to our storage box, to better define its shape. Rows of rivets – just simple dots – along the top and bottom stripes around the windows. And last but not least, the lettering for our wagon sign. This is a luxurious first-class passenger wagon, of course.
How to draw a train passenger wagon: finished drawing
How to draw a train passenger wagon: finished outline drawing

Well, now we are finally done. Here is our complete drawing in a single colour black outline. Quite a good looking passenger wagon. What do you say?
How to draw a train passenger wagon: finished drawing coloured-in

As a final step, you can colour in your wagon. Here we have kept the same colour scheme as the locomotive and tender. The wheels, sides of the wagon and roof are red. The frames around the windows and the platform doors are wooden brown. Golden bronze or dark yellow for the rivet stripes and sign, and some dark black for the underside of the wagon – floor, wheel trucks, and the storage box. We have shaded our windows light blue, to suggest the glass. We also have one simple silhouette of a passenger. Or is it the ghost of a passenger, if he is all light grey?
Like this tutorial? Share it with others:
How to draw a train: join the wagons together
How to draw a train: complete train drawing in one picture

These are really the final improvements on the train drawing. What is missing in all the pictures above is the bumpers that each train car needs to have. We have also drawn the safety chains, that link the wagons together. Another part really important for the real train is the actual couplings that join the train together. But since they are hiding behind the bumpers, we have left them out completely to simplify the drawing. And that is our complete train drawing in its full glory.
Like this tutorial? Share it with others:
How To Draw A Realistic Train Step By Step
Source: https://letsdrawthat.com/how-to-draw-a-train/
Posted by: caballeroarriess.blogspot.com
0 Response to "How To Draw A Realistic Train Step By Step"
Post a Comment