

How To Create A Textured Background In Photoshop
Create smoother skin textures with basic Photoshop filters
Blotchiness on skin is very common in studio-shot images, especially under harsh studio lights with contrasty processing and after long days spent standing in awkward poses. When correcting blotchiness, it's best to use the Healing, Clone Stamp, Dodge and Burn tools first, to deal with the most glaring blotches. After that, a subtle skin-smoothing process can be applied to perfect the image. If the results are too unsubtle, it's easy to tone down and tailor the effect.
The process may feel a little fiddly, but it suits being recorded and turned into a Photoshop action, so you can then set up a whole skin equaliser section at the touch of a button whenever you encounter a surface that needs smoothing. This technique can also be used to smooth hair and fabrics.

01 With the image loaded, the first step is to make a duplicate, which you can do by pressing Cmd/Ctrl+J. With the duplicate selected, change the blending mode to Linear Light, and the Opacity to 50%. Now invert the layer, with Cmd/Ctrl+I. Name the layer Low Detail, and now make three duplicates of this layer, labelling them 'Medium', 'High' and 'Fine Detail', going up.
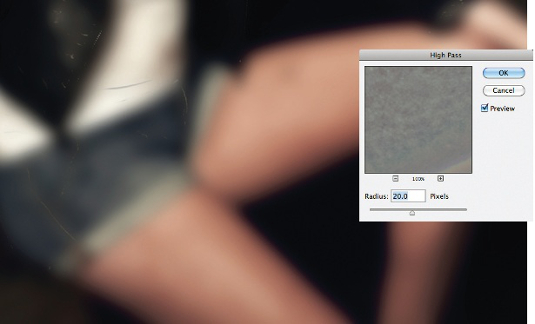
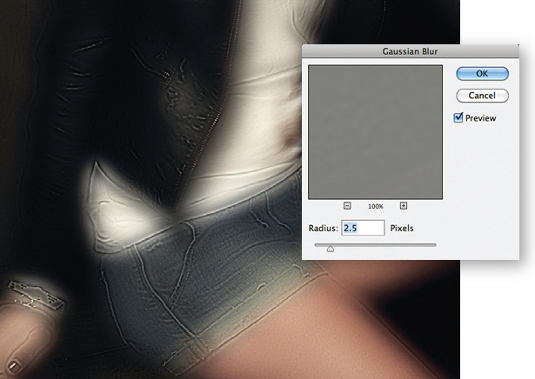
02 Turn the visibility off for all but the Low Detail layer. Now select the High Pass filter, from the Filters>Other. You'll notice, inverted, the High Pass produces a blur. We need to find a radius where all blotchiness is smoothed over. I'm using 20px. Now select a Gaussian Blur filter. Inverted, this acts like a High Pass filter, restoring detail. Select a radius of 75% of the one used for High Pass: 15px.
03 Next, repeat this process for all the layers, with progressively smaller radii. For our Medium layer, make it visible, and then we can use a High Pass of 15px, and a Gaussian Blur of 10px. For high detail use a High Pass of 10px and Gaussian Blur of 5px. And for our fine detail layer, use a High Pass of 5px, and a Gaussian Blur of 2.5px. This 2.5px ensures we won't be blurring any detail below 2.5 pixels in size.

04 Create a Group layer, and move all the high passed and blurred layers into it. So far the process hasn't been particularly kind to details and edges, so add a mask to our Group layer. Now, with the mask selected, invert the mask, by pressing Cmd/Ctrl+I, and select a soft, white paint brush. We only want to paint this effect over flat regions of skin, avoiding edges, details, and specular highlights such as the one by the knee.
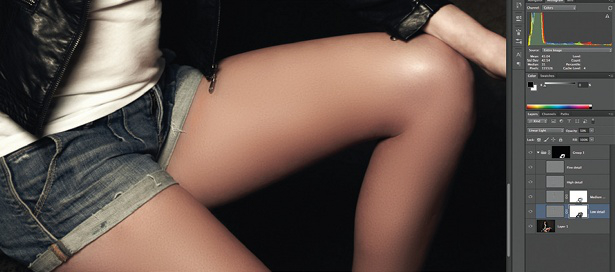
05 The effect is probably too aggressive applied like this so individually toggle each layer's visibility to see how detail is removed at different spatial levels. We can then use each layer's Opacity slider to mix in and out the effects to desired levels, from 0 to 50%. We can also add additional masks to each layer, to control the effect further – for instance, the Low Detail layer can benefit from being masked further from the edges.
Related articles
How To Create A Textured Background In Photoshop
Source: https://www.creativebloq.com/create-smoother-skin-textures-basic-photoshop-filters-5133820
Posted by: caballeroarriess.blogspot.com
0 Response to "How To Create A Textured Background In Photoshop"
Post a Comment